Image segmentation is a critical step in image analysis. The subsequent steps become a lot simpler when the parts of the image have been well identified.
The first step is to identify a region of interest (ROI) which contains characteristics that are unique to it. This ROI will serve as a reference to categorize the pixels in an image.
In grayscale images, segmentation is done via the process of thresholding. It is the simplest and most common method of segmentation. In this method, the pixels are allocated according to the range of values in which the pixels lie.
Consider Figure 1 which contains an image of a check. The goal is to recover the handwritten text.
 |
| Figure 1. Original image |
 |
| Figure 2. Code to get grayscale histogram and to convert to BW image with different threshold values |
 |
| Figure 3. Grayscale histogram of the input image in Figure 1. |
In thresholding, the pixels are categorized into two i.e. black or white. Pixels whose grayvalue are below the threshold are classified into one category and those above are in the other category. Here I tested different thresholds and see identified the value which will give me the clearest handwritten text.
\[ threshold \,T = 25,50,75,100,125,128,150,175,180,190\]
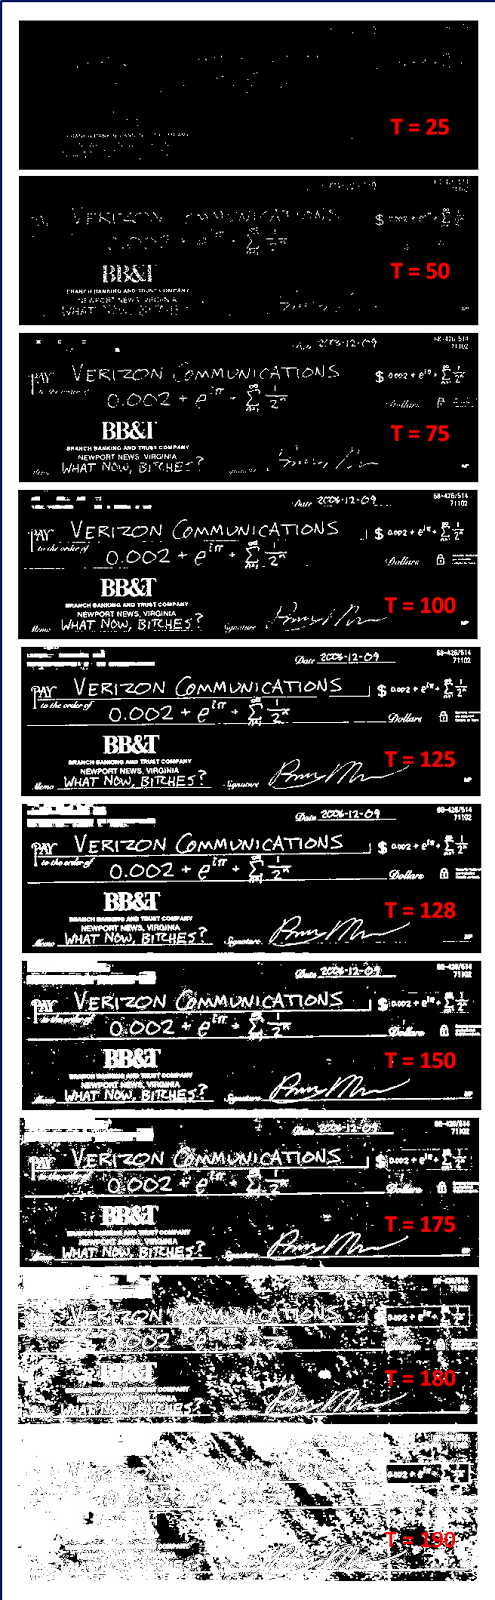 |
| Figure 4. BW images with different threshold values |
From the histogram in Figure 3, we will expect the result for T = 190. Since the peak corresponds to g = 190, it means that almost all of the pixels will be classified into the higher boundary i.e. white and thus, we can almost no longer see the details on the check.
Now we proceed to the region-based segmentation wherein we apply two methods: 1) Parametric Method 2) Non-parametric/Back projection histogram method
PARAMETRIC METHOD
It is not all the time that thresholding is successful in segmenting an image. In this case, we take advantage of another property of an image -- color. The colors that we see are a ratio of the three primary colors: red, green, blue or RGB. In reality, there is variation in the shade of an object's color. An example would be the effect of shadows on the brightness of the object's surface. To solve this, we represent the color space by the normalized chromaticity coordinates or NCC. This way, the separation of brightness and chromaticity is taken care of.
 |
| Figure 5. Normalized Chromaticity Coordinates |
Figure 5 contains the NCC. The y-axis corresponds to g while the x-axis to r. Consider a pixel and let
\[\begin{equation}\label{ncc} I = R+G+B \end{equation}\]
then, the normalized coordinates are given by \[\begin{equation}\label{r}r = \frac{R}{R+G+B} = \frac{R}{I} \end{equation}\]
\[\begin{equation}\label{g}g= \frac{G}{R+G+B} = \frac{G}{I} \end{equation}\]
where \[r+g+b = 1\] so that \[b = 1-r-g\]
We have now simplified the color information into only two dimensions r and g. Know that they contain the color information while I takes care of the brightness information.
From Figure 5, x = 1 corresponds to pure red; y = 1 corresponds to a pure green; the origin to pure blue and point (0.33,0.33,0.33) to white. Later in the non-parametric method, we will see how the color values in the image are distributed in the NCC plane.
Segmentation using colors is done by determining the probability of that pixel to be in a particular color distribution or the PDF of the color. The PDF is obtained from the color histogram of the chosen ROI. The color distribution of the ROI serves as reference to the pixels. Now, because we have represented the information using r and g, the PDF is also a combination of the probability of these two. For example,
\[\begin{equation}\label{PDF} p(r) = \frac{1}{\sigma_r \sqrt{2\pi}}\exp{\frac{-(r-\mu_r)^2}{2\sigma_r^2}} \end{equation}\]
where the mean $\mu_r$ and standard deviation $\sigma_r$ are the parameters. The same can be done to find $p(g)$. The combined probability is the product $p(r)*p(g)$.
Now we consider the Santan flower in Figure 6 which will be the main object of interest and comparison for both methods of region-based segmentation. What I want is to separate the flower from its background.
 |
| Figure 6. Santan flower |
 |
| Figure 7. ROIs on the Santan flower |
Below is the code to do the parametric segmentation.
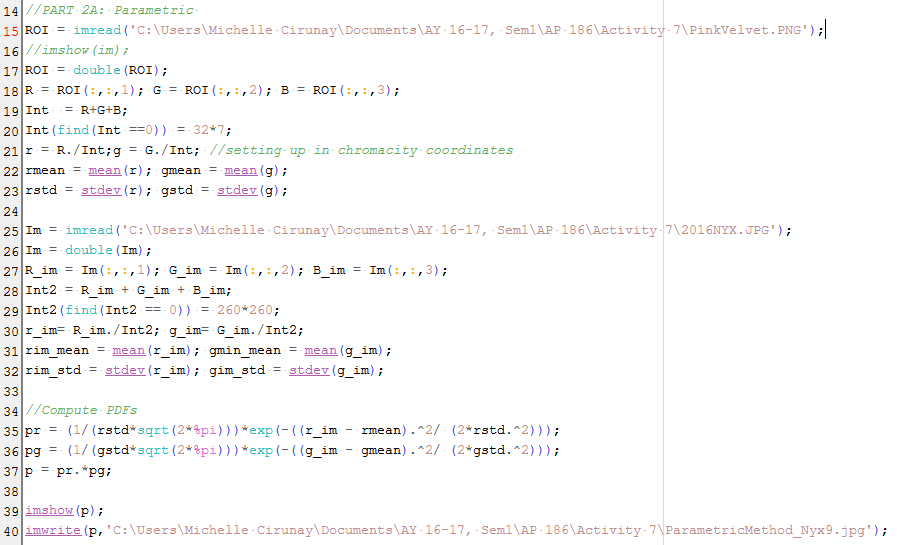 |
| Figure 8. Code used to do parametric method |
The success of patch 6 I believe is due to the variation of colors and brightness in the patch itself. You may want to look at Figure 7 again for reference. The patch is taken from the center of one santan flowerette (if there's a name for the small flowers :) ).
 |
| Figure 9. Resulting segmented images using the parametric method |
We now proceed to the non-parametric method. By its name, we know that unlike the former, it is not dependent on any parameter like the mean $\mu$ and standard deviation $\sigma$ for computation and the separation process itself. Instead, the method is most dependent on the color histogram of the image.
Using the code given by Maam Jing in the manual, the 2D histogram was computed and eventually, we project this distribution into the actual image itself. The histogram will later then be compared to the NCC plane and see if it matches.
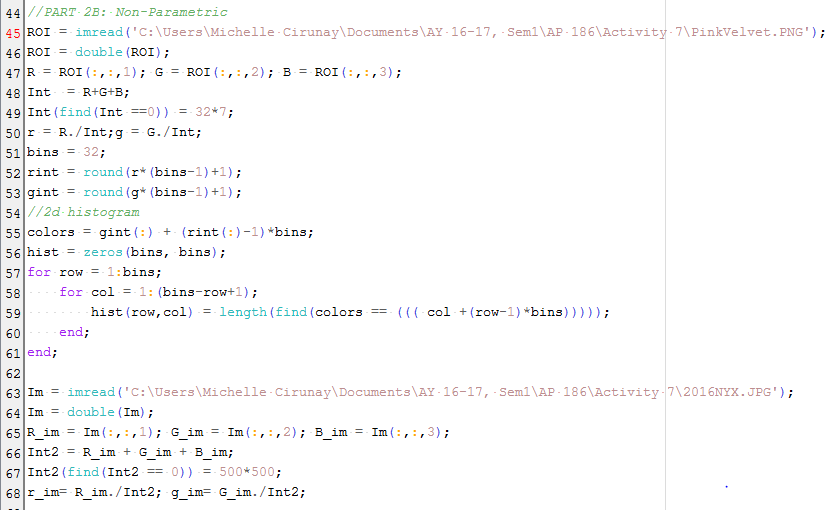 |
| Figure 10. Code on the non-parametric method set-up and computation of 2D histogram |
 |
| Figure 11. Back projection code |
 |
| Figure 12. Resulting segmented images via the non-parametric method and their corresponding back projection histograms |
The next important thing to do is to compare the results of both methods. For patches 1-5, the non-parametric method gave more desirable results since it gave more white regions that belong in the petal parts. But for patch 6 and 7 the parametric method was more effective since in the non-parametric, the regions which correspond to the in-betweens of the flowerettes are gone. So I guess, the parametric method can handle the finer details.

Figure 17, shows cropped parts which correpond to the ROI for each. The same methods were employed and what's left is to feed everything into the program.
The results are shown below. Looking at Figure 18 and 19 individually would seem as if both methods are tie in separating the respective lips for each ROI.
Just a slight segue. Notice that the 2D histograms for all show the color distribution to be somewhere in blue-to-green regions. Even the Red Velvet and other seemingly shades of red. I believe that dark colors and pink shades [combination of red and blue] in general are found in this region. I also noted the result for the SuedeBerry which is a color very near to that of the Santan flower (only darker); the 2D histogram also looked similar.
Anyway,I opted to place them side-by-side and did some scoring with stars. Just like what teachers do in kindergarten! :)
This time, the non-parametric method emerged as the victor of segmentation with 11 stars! :)
What I deduced from the results is that, the parametric method is more efficient for images whose color gradients are not high or that the pixel rgI values are not very far away i.e. in the case of Santan and my picture whose differences lie on the shade. On the other hand, the non-parametric method is more appropriate for images which contain colors which differ obviously from each other such as the case of the NYX palette. But then again, since I only tested a few samples, this conclusion may be wrong.
Another thing that I explored in this activity is the effect of the size of ROI to the segmentation. I found out that the size matters but only very slightly. Resizing it but maintaining the aspect ratio won't have any effect at all.The key is in choosing the ROI such that it captures the range of colors in the entire region.
Rating: 10/10 because I did my best and had fun! :)
References:
 |
| Figure 13. Comparison of the results of the Parametric [row 1] and Non-Parametric Method [row 2]. |
We have the theory and the code in our hands, it's time to have fun! This time I applied the methods to different images. Consider Figure 14 which contains my face and a crown of brown curly hair which will be my object of interest.

Figure 14. My face and ROIs
Given the four ROIs, I want to separate my hair region from the rest of the image. The results were not nice. Scary,actually. Haha My facial region was also included! This could be because my hair is not dark and black. The gradient in the colors may not be too large. In the results, ROI #3's was the closest to being successful for both the methods since it separated my head from the background. But to compare, the parametric method is better since my face frame was also sort of separated from my crown of hair and details of my face are recovered too! :)
"Negative results are positive knowledge." -Dr. M.Soriano (2016)
"Very timely and appropriate."- Me(right now)
 |
| Figure 15. Segmented images using both methods |
Hours before I started working on the activity again, I was talking asking my friend about lipstick shades since my mom has been nagging me on my lack of talent in the field of beautifying myself. And since we're dealing with colors, I thought it would be interesting to look at lipstick colors more scientifically! Below is the palette of NYX lip balms launched in 2016. :)
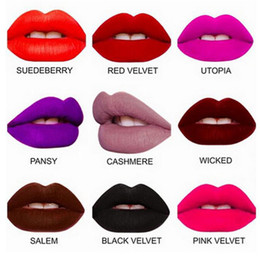 |
| Figure 16. NYX lip balm color palette |
 |
| Figure 17. Lip ROIs |
The results are shown below. Looking at Figure 18 and 19 individually would seem as if both methods are tie in separating the respective lips for each ROI.
 |
| Figure 18. Segmentation via Parametric Method |
 |
| Figure 19. Segmentation using Non-Parametric Method |
Just a slight segue. Notice that the 2D histograms for all show the color distribution to be somewhere in blue-to-green regions. Even the Red Velvet and other seemingly shades of red. I believe that dark colors and pink shades [combination of red and blue] in general are found in this region. I also noted the result for the SuedeBerry which is a color very near to that of the Santan flower (only darker); the 2D histogram also looked similar.
 |
| Figure 20. Back projection histograms |
 |
| Figure 21. Comparison of the two methods |
This time, the non-parametric method emerged as the victor of segmentation with 11 stars! :)
What I deduced from the results is that, the parametric method is more efficient for images whose color gradients are not high or that the pixel rgI values are not very far away i.e. in the case of Santan and my picture whose differences lie on the shade. On the other hand, the non-parametric method is more appropriate for images which contain colors which differ obviously from each other such as the case of the NYX palette. But then again, since I only tested a few samples, this conclusion may be wrong.
Another thing that I explored in this activity is the effect of the size of ROI to the segmentation. I found out that the size matters but only very slightly. Resizing it but maintaining the aspect ratio won't have any effect at all.The key is in choosing the ROI such that it captures the range of colors in the entire region.
Rating: 10/10 because I did my best and had fun! :)
References:
[1] M. Soriano,"Image Segmentation", Class manual.(2014).
[2] "Chapter 4. Segmentation", retrieved from http://www.bioss.ac.uk/people/chris/ch4.pdf on 2 October 2016.
No comments:
Post a Comment